Veggie Scraps

Often times when you are cooking you find yourself with many ends of vegetables that you would not consider eating. These scraps often end up in the compost, or at worst, the garbage. Instead of tossing these onion tops, celery leaves, carrots peels, and red pepper scraps into the trash, save them in a bin in your freezer. Gradually add in these scraps until you have time toss them into a pot, cover with water and make yourself a vegetable stock. You can use this stock to make soups, to flavour your rice or quinoa, or to add to other dishes. You can also do this with saved bones if you eat meat. 
Directions

Pour a small amount of oil in a large stock pot. Add the veggies and/or bones (caution if these are still frozen as the water frozen in the products can cause the oil to splatter) and brown for 5-10 minutes. Add water to cover the veggies or bones and bring to a boil. Let simmer 30 minutes. Cool and strain out the solids. Either use the stock immediately to make a soup, or save to use in different recipes to replace stock. I often divide it up in 1-2 cup portions and freeze for a later date. 
ย Coffee Face Scrub

I use this scrub whenever I feel my face needs a little deep cleaning, whether I have a buildup of dry skin or a sudden onset of acne. 

Ingredients

4 tbsp used coffee grounds

1 tbsp olive oil

2 tbsp sugar

Directions

Mix ingredients together in a sealable container. To use, wet a washcloth under hot water and then hold to your face to gently open up your pores, soften the skin, and soothe. Using your hands, scoop out a small amount and gently scrub onto face. Re-wet washcloth in hot water and gently remove scrub. You may wish to wash your face afterwards with a gentle cleanser. Store in fridge. Use within 1 month. 

Homemade whole wheat crackers

We have been trying to reduce the amount of garbage we put out each week at our house and one big way we’ve done this is by making a lot of things from scratch. Over the years we have been able to significantly reduce the trash we bring to the curb (for biweekly pickup where we live) by recycling and composting, but one area I found we were failing was in plastic bag use. 

We use reusable bags for buying groceries but so much of what we buy comes in plastic bags, including bread, produce, meat, cheese, milk (yes, milk comes in bags in Canada), cereal, crackers, as well as other snacks and treats. We reuse most of these bags to carry our sandwiches to work or store foods in the fridge to keep fresh, but that only extends the plastic bag use a little bit. I want a to eliminate it altogether. (I am happy to note that we do not buy plastic or ziplock bags and simply reuse their bags that come into our home). 

One way to limit our plastic bag use is through making things like cereal, bread, and crackers from scratch. Check out my earlier post on making a nice sandwich bread from scratch at home with a few simple ingredients and just a little time and effort. 

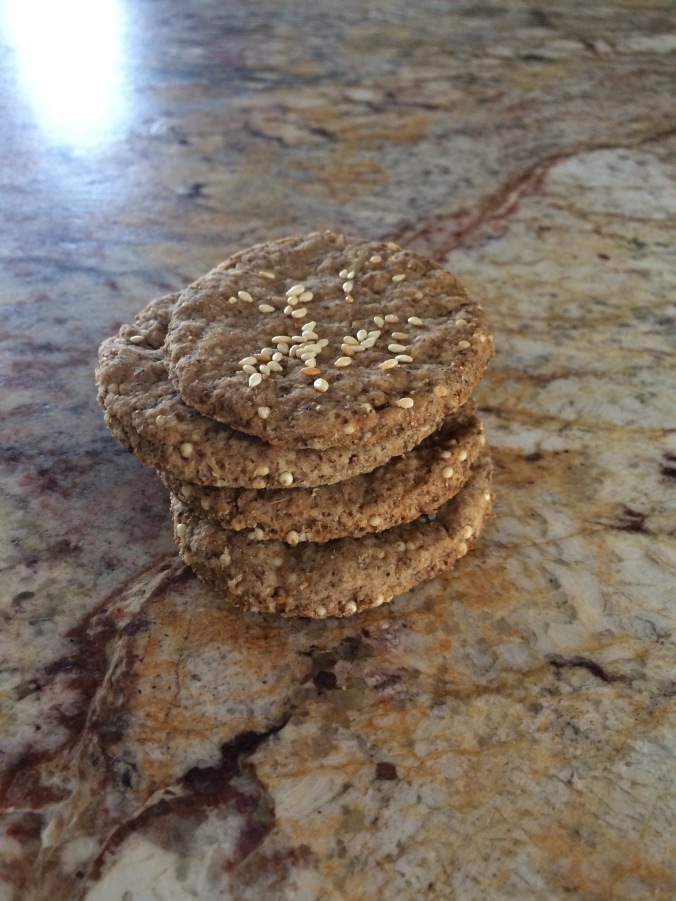
This recipe makes a very hearty cracker that is both filling and satisfying. It pairs well with peanut butter, cheese, or even a little honey. 

Now, onto the recipe. 


Ingredients

1 cup all purpose flour

1 cup whole wheat flour

1/2 tsp baking powder

1/4 cup uncooked millet or other crunchy grain

1/3 cup flax or chia seeds

1/2 tsp sea salt

1/2 cup olive oil

1/2 cup water

Seasoning of choice (salt and pepper, rosemary, child powder)

Directions 

Preheat oven to 350. In a medium bowl, mix together everything except olive oil and water. Slowly add olive oil, fluffing with a fork. Then slowly add water and begin to mix with hands until the dough comes together. Knead for 2 minutes. Roll dough out on floured surface to desired thickness (1/8″). Bake 20 minutes. Store for a week or so in your cupboard or freeze to extend storage. 

Save Your Bacon

Save your bacon! Okay, so I don’t often buy bacon, but every so often it ends up on sale and we enjoy it as a treat. Since it’s just the two of us it’s hard to get all that bacon consumed before it goes bad without suffering some serious consequences (e.g. tummy aches, chest pains, and backside expansion!). We save our bacon by rolling up individual slices and freezing it on a tray before tossing it into a freezer bag or plastic container. The frozen bacon keeps very well and I can take out the individual slices when needed. 

When cooking bacon, we like to bake it on a rack with an aluminum foil-covered baking tray underneath to catch the grease. It takes about 20 minutes at 250 degrees, turning once, and the bacon is a little less greasy then when made in the frying pan. It’s also quite delicious.

I also like to save the fat in a mason jar in the fridge to use as a fat alternative in my cooking. I pour the grease from my cooking into a glass jar I store in the fridge, avoiding any little bits and pieces so it’s just the clean grease. You can also filter it through a coffee filter to keep i extra clean. It’s a nice treat when frying up perogies or potatoes ๐Ÿ™‚

Earth Month Day 5

I feel I’m doing pretty well so far with this challenge. In the past few days I’ve decluttered and given quite a few things away, I’ve significantly reduced my garbage (hoping to put out only a chip bag worth of garbage for the past two weeks – and looking to reduce even further from there!), and I’ve also eliminated our use of plastic and resources, and I’ve tried to connect with neighbours more often. Check out some of my successes so far this month:

  1. Made bread at home = one less trip to the store and 1 less plastic bag
  2. Made crackers at home = no box or bag to put in the trash/recycling
  3. Made yogurt at home = saved $$ and no plastic tub to put to the curb
  4. Made all our meals at home
  5. Made baby food from scratch instead of purchasing prepackaged pouches or jars 
  6. Made coffee at home and brought a coffee and muffin with me both days so far this week so I didn’t buy one while out = saving the container waste and $$
  7. Breastfed my baby for the past 9 months (whatever you choose to do is best and no hate coming from me, but I had to add it to my Earth Month win because of the reduced waste and savings)
  8. Started some more veggies from seed to grow this year, received from someone on my Buy Nothing group. 
  9. Made plant markers out of pop cans and old hangers I received from my Buy Nothing Facebook group
  10. Eliminated or significantly reduced the need for paper products in my home (eg paper towel, sanitary products, note pads…)
  11. Collected plastic bags to drop off at our local TAKE IT BACK program for recycling 
  12. Organized and collected cloth diapers and supplies to donate to a local charity to help other families ditch disposables
  13. Cloth diapered my baby for the past 9 months 
  14. Pottied my 9 month old, saving on diapers and reducing my cloth diaper laundry to 2 loads a week (stay tuned for my post on elimination communication)
  15. Did laundry after 7pm to stay off-peak, reducing the burden on our system and saving $$
  16. Turned the heat down every time I went out, saving energy and $$
  17. Kept the lights off when I didn’t need them as the days are finally getting longer
  18. Planned my outings so that as little driving as possible was done

I believe we were able to reduce our utilities bill by $20 last month, so I’m excited to see what we can do this month ๐Ÿ™‚ 

How have you done so far this month? Any ideas on what to tackle next? 

Homemade Body Wash

We love a little DIY around here, and if you’ve been following along with my blog posts so far you also have figured out we like saving money, decreasing our waste production and plastic use, and try to limit our exposure to various chemicals. Thankfully we’re able to do all of the above when making our own body wash, and not only is it super simple to make it is luxurious to use! 

Ingredients

1/4 cup honey (I like to microwave it for 30 seconds to get it a little runny and easier to mix)

2/3 cup liquid castile soap

2 tsp olive oil

35 drops lavender essential oil

15 drops tea tree oil 

Directions

Add all ingredients in a 2 cup or larger measuring cup and whisk to combine. Pour into desired container (I use an old pump container). You can add 1/4 or so of distilled water to thin it out a bit and make it last a little longer. To use, pump a small amount onto a poof or similar and scrub away!

Homemade Sandwich Bread


Mmmm, there’s nothing better than homemade bread! Not only is it delicious, but you know exactly what is going into your bread (and therefore your body), and there’s no plastic bag waste when you’re done! 

There are healthier recipes out there but this one is soooooooo easy I love to make it. It also makes a nice, light loaf of bread that’s great to use for sandwiches or snacking. 

Ingredients

1 cup milk

1/2 cup water

1/4 cup butter, melted

3 tbsp honey

3 3/4 cups all purpose flour

2 1/4 tsp yeast

2 tsp salt

Directions

Warm milk and water for 1 minute in microwave. Add honey and butter. 

Combine flour, yeast, and salt. 

Slowly add liquid mixture to dry ingredients, mixing with a wooden spoon until dough just comes together. 

Turn dough out onto floured surface and knead for 10 minutes. 

Place dough into oiled bowl and let rise at least 1.5 hours. 

Turn dough out onto counter and punch down. Flatten dough out into rough square. Fold dough in thirds and place seam side down in pan. Let rise another 1.5 hour. 

Bake 45 minutes at 350 deg F. 

Enjoy!

Earth Month Challenge: Day 1

Today was a very successful one, and a great start to my Earth Month Challenge. 

I started the day off making a number of things from scratch. The first item I tackled was granola, made using an adapted recipe from The Homemade Pantry by Alana Chernila. I highly recommend the book if you ever wanted to try your hand at making yogurt, cheese, or other common treats we tend to buy prepared from the store. 

I then whipped up some chocolate chip oatmeal black walnut cookies made with black walnuts I harvested last year. Yum!

All the baking got me hungry so I stopped for a lunch of Turkey Noodle Soup. I unfortunately don’t have a recipe for the soup as I make it from whatever I have on hand. This particular soup was made from our Christmas turkey and veggie scraps I had stored up in my freezer, as well as some fresh carrots, onions, and celery. I added in some alphabet pasta for a little whimsy. I will usually freeze a few mason jars’ worth whenever I make soup so that I don’t have to eat it for every meal until I was done. I can then put a jar in the fridge to defrost overnight and I have an easy, homemade meal waiting for me!

I also got a little sewing done today, including making a few wet bags for my cloth diaper storage from a larger wet bag I wasn’t using, and making some more baby wipes out of flannel receiving blankets which I was gifted from my Buy Nothing Facebook group. 

I was also able to gift a number of things to my Buy Nothing group

I asked a friend to teach me how to needle felt as I saw some amazing little woodland creatures she made for her son. 

I also saved a few plastic bags from the trash for future use, limited by driving today, and used my cloth bags for groceries today. 

All in all I think it was a great start!

Earth Month

As many of you know, April 22nd is Earth day and I have expanded it into Earth Month for myself. Recently, I joined a BuyNothing7 Challenge organized by Liesl Clark and Rebecca Rockefeller. These two individuals have done amazing work when it comes to connecting with your neighbours, reducing consumerism and our need for stuff, and developing an understanding of the difference between needs and wants as part of their Buy Nothing movement (including facebook groups throughout the world) and this most recent challenge. 

Over the next month I will work to give more, ask my friends and neighbours for help with various projects, make items from their basic components, fix things that need to be fixed, reflect on my needs vs. wants, try to limit my use of resources, work to bring my community together to share and help each other, and to be kind both to myself, the environment, as well as to those around me. 

If this is something that you think would work for you, please join me on this journey. I will try to post something each and every day wherein I am working towards these ideals. My ultimate goal is to not purchase anything outside of my basic groceries, fuel, and monthly bills for this month – wish me luck!. Please join me on this journey and share with me the efforts you are making to change how to move, act, and feel about yourself and the world around you. 

Homemade Foaming Hand Soap


Although the foaming soap dispensers tend to last a lot longer than the regular ones, it can still get a little pricey to buy them regularly depending on what brand. You also can generate a lot of plastic waste buying a new bottle every time, and some of the products may not be the best for your body or your health. Because of this I decided to try my hand at making my own foaming hand soap. We’ve been using this same one for 3 years now and it’s working out great. Best of all it uses the same ingredients as my household cleaning products plus an item or two from my kitchen, so the only thing I needed to get was a foaming dispenser. 

I found a porcelain/metal foaming soap dispenser at Winners, but may have been able to source one from a neighbour if I had wanted to reuse a plastic one. I only have to refill it every 3 months or so, so it takes very little work make. 

Ingredients

1 cup water

1 tbsp liquid castile soap

1/2 tsp olive oil (optional but moisturizing…may gum up your dispenser so caution!)

10-20 drops of essential oil of choice (optional)

Foaming hand soap dispenser

Directions

Add ingredients to measuring cup and whisk to combine. Pour into foaming dispenser. Use and enjoy ๐Ÿ™‚